
OBS (Open Broadcaster Software) is a great program for streaming and recording gameplay on a PC. I’ve used it quite a lot, but it has frustrated me for a while that the Mac version has – through no fault of OBS – no ability to capture game audio. On the PC, you can capture “desktop audio” or “what U hear”, but that’s not an option on OS X. On older Macs, you could run a 3.5mm to 3.5mm cable from the headphone socket to the line in socket, but on newer Macs there’s one socket that does both directions, so that’s out.
A year or so ago I tried to get either of two solutions working: Soundflower, which sort of did but was really fiddly, and WavTap which never seemed to work at all. Recent versions of OS X have actually prevented Soundflower from working as intended at all, so there was no (free) solution and I stopped using OBS on a Mac. Until last week.
Soundflower was still in my system settings, albeit unused, and I’d never got round to uninstalling it. It irritated me every time I saw it there but was always busy doing something else and kept forgetting to remove it. This time, however, I finally looked up how to and in the process came across a new utility which effectively replaces it, and works: IShowU Audio Capture. There’s a full (paid for) software package called IShowU, but all you need for this purpose is the audio capture part, which is free.
How to make IShowU work with OBS
Firstly, download IShowU Audio Capture from this link, and install it as shown. You don’t need Step 6 yet, so do 1-5 and come back.
(time passes)
Done? Hello again!
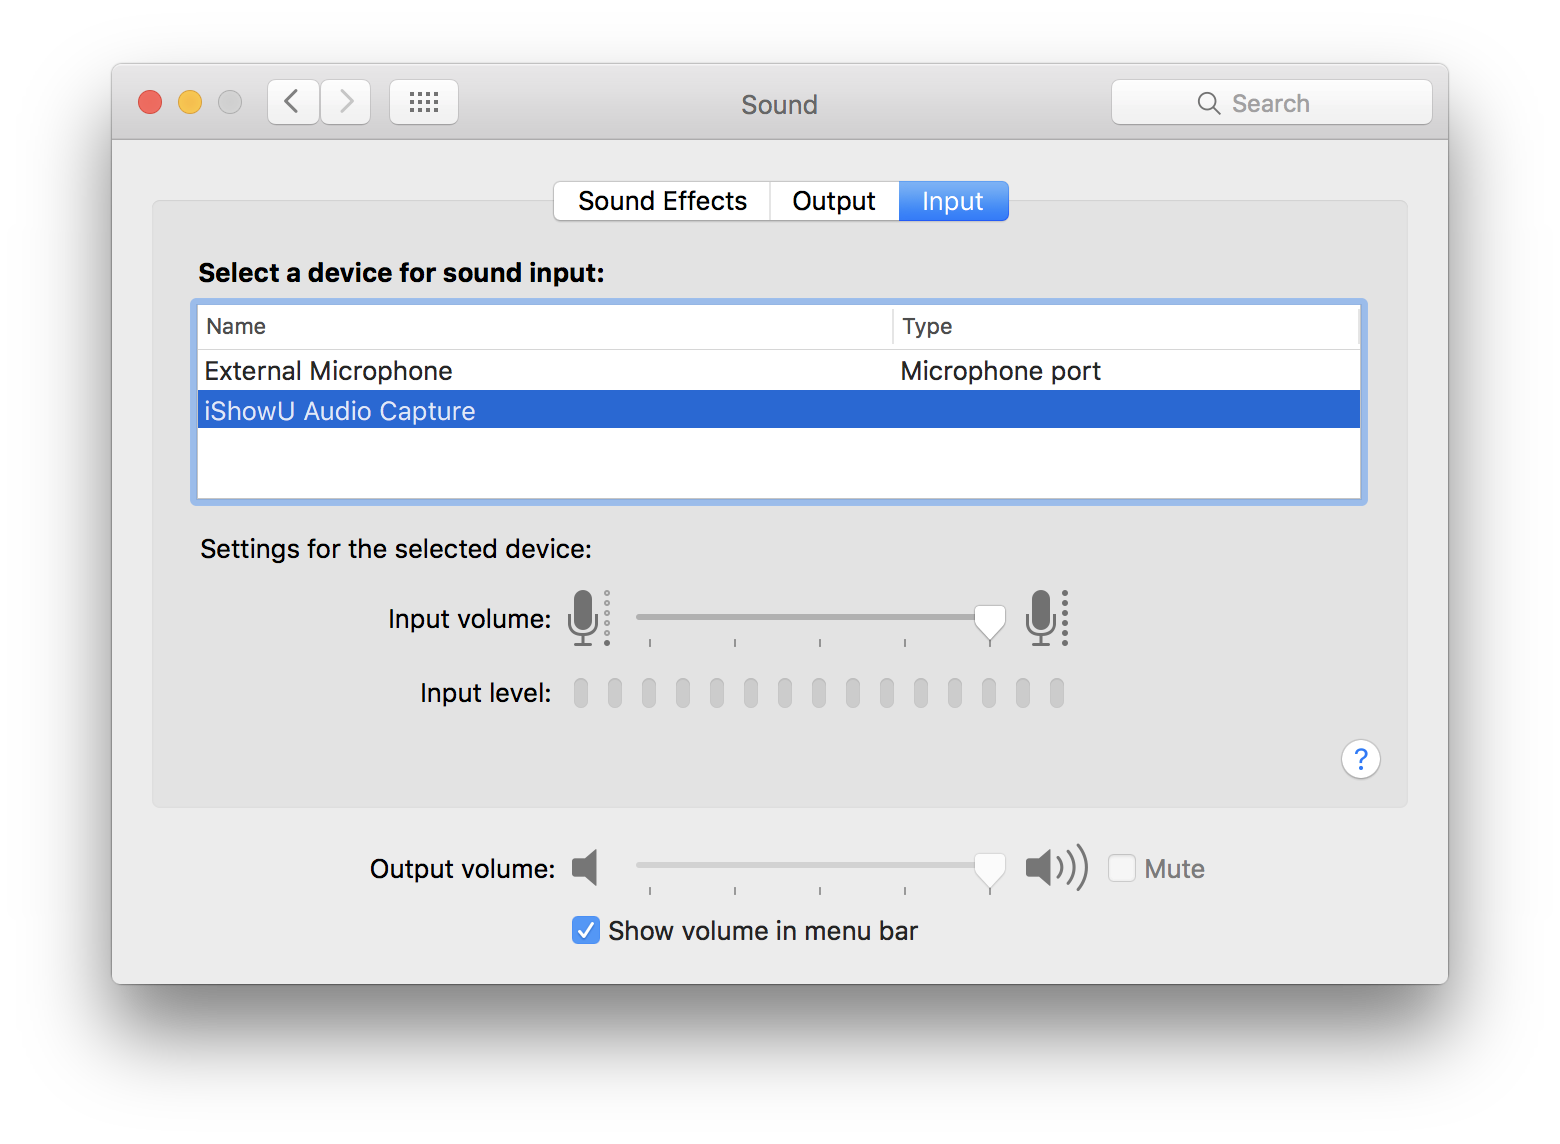
So, step 6 is going into System Preferences > Sound and choosing IShowU Audio Capture as your sound input device, which will work, but keep reading for an additional tweak.
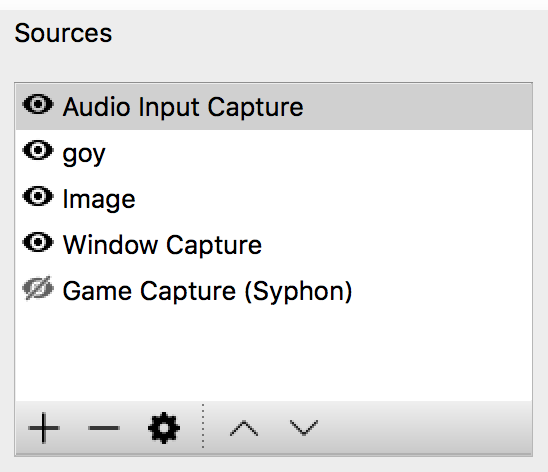
All you need to do now is open up OBS and choose a new Audio Input Capture source (click the + under the Sources box), then choose IShowU Audio Capture as the device. That’s it!

Only… there’s a snag. This will indeed capture all “desktop audio” (so you’ll probably want to close or mute email notifications and so on when streaming or recording), but crucially it won’t actually output any sound to your speakers or headphones so you’ll be playing mute. This might not be a problem, but if it is, read on.
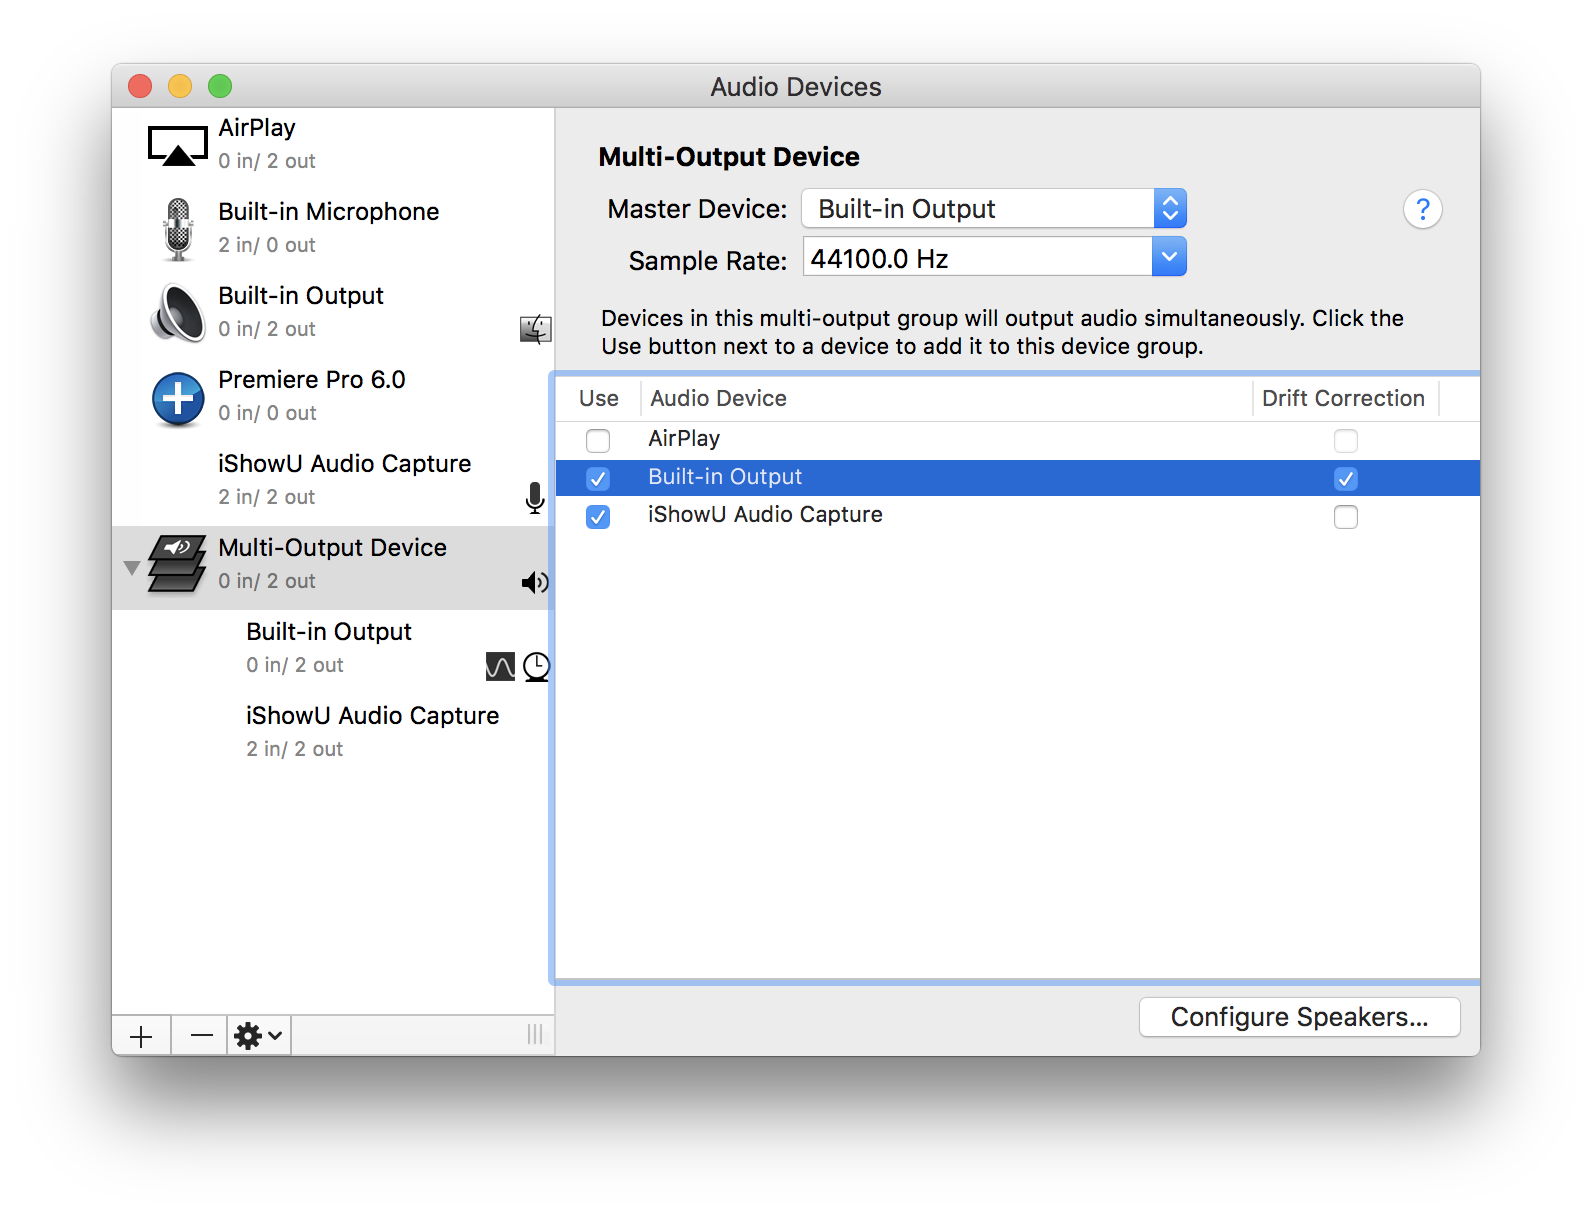
Open up the Audio MIDI Setup app from Applications > Utilities. In here we’re going to create a multi-output device, so you can output your desktop audio to both IShowU and headphones/speakers/whatever at the same time.
Click the + in the bottom left, and choose “Create Multi-Output Device”. Then, in the right-hand pane for this new device, make sure you tick “Built-in Output” and “iShow Audio Capture”. Leave drift correction set to Built-in Output.
Close that, and head back over to System Preferences > Sound. You’ll now have an output option for your new Multi-Output Device. Before you choose it, make sure you set your volume level how you want it: you can’t adjust the volume of a multi-output device!

With the volume set, choose Multi-Output Device as your, er, output device, and you’ll notice the volume slider grey-out. It’s time to go back to OBS and configure the Audio Input Capture there – same as before, choosing IShowU Audio Capture.
You’re done, although you might want to remember to choose your usual output settings in System Preferences when you’re finished recording!
Pingback: Some recent gaming videos - deKay's Blog
Bless this post 🙂 It helped a ton! I just wanted to add a note.
If anyone wants to add commentary too from their mic into OBS, go to Settings –> Audio. I added it in Settings instead of from the main screen where you add sources. It looks like this in the Audio tab for me.
Mic/Auxiliary Audio Device: iShowU Audio Caputure
Mic/Auxiliary Audio Device 2: Built-in Microphone*
*This is just me not having a quality microphone yet, so I’m using what the computer has. Obviously this will be different for those who DO have a nice microphone.
Thank you! Both to you and this post, I finally got it all to work 🙂
Thanks for that. On mine I just had to set the first Mic/Auxiliary Audio Device to Built-in Microphone (it works for external mic too) and the desktop audio is taken care of by the method above.
It doesn’t work!!!
My voice goes through cleanly, but my friends voice is really low. We’re in a party in discord and talking to each other through our headsets.
Thanks a lot! after a 100 Tutorials, this one really worked. You are a genius.
Pingback: What Live Stream Software is Best for Video Conferencing?
Holy mother of GOD! Finally someone had an answer to my problem!!! I must have spent 2 hours looking for a way to record desktop audio and still be able to hear it and YOU were the only one to have the answer! THANK YOU!
This is great and very helpful. But I wonder, can I record me talking at the same time? Is it possible to use multiple inputs too?
It is, yes – just add your microphone as another Audio Input Capture in the Sources box.
yes it is, i did it, set the master device to iShowU Audio Capture
Thank you, unsung hero of my day! I lost 2h to that problem today, but you sir, helped me getting out of trouble. Webinar starts in a few hours… he he!
THANK YOU!!!! I have visited about 5 sites before this and they all didn’t work!!!!!!!! THANK YOU!
Hey, I did everything as you said. However, when I have the master on, I keep getting this irritating high-pitched noise that goes along with anything I play on Mac. Livestream is clean, the noise I get is on the headphones. Any clues on this? Thanks!
Multi-Output device* i mean, instead of master. Sorry!
Sounds like feedback somewhere. Have you looped your audio twice in OBS? Or have two inputs or outputs that clash?
Hmm I don’t think so. How should I know If I looped it twice? I’m using Apple’s Earphones as Built-In Output along with IShowU
I wondering if maybe you’d set one of the active outputs also as an active input. Are you able to test with some other headphones, perhaps? If they’re Apple earphones with a built-in mic maybe that’s getting involved somehow?
And just to check – you don’t have the volume whacked up to max anywhere?
Pingback: bro, how do I stream on Mac? | HeWhoDares.com
It Wont Work For me at all! I did everything You typed for me to do! I tried to get a commentary and It DID NOT work. What do I do!? I set my input audio to the iShow Thing and set the output to the Multi settings and When I TRY TO GET A COMMENTARY it only goes to my mic! No Desktop Audio AT ALL! HELP!!!!!!!
This was so incredibly helpful! Thank you so much, I tried numerous different softwares and tutorials to put sound behind streams and recordings and this was the only one that worked! You are a blessing <3
It works but only records my voice and not my desktop audio, Any suggestions?
All I can suggest, is double check everything is set up correctly, make sure you don’t have any volumes set to minimum, and restart your Mac (I Show U might not fully work until a restart after it has been installed).
Also, I’ve not tested this with High Sierra, so it’s possible it doesn’t work with that if that’s what you’re using.
I followed your instructions, but was still not getting the audio recorded, I was reading some other posts and saw a comment that said you have to launch your recording source (e.g. youtube video) AFTER doing the set up – your set up then worked for me
i am able to download but won’t install says 1 error 4960
downloaded, installed, followed all steps, restarted computer. still nothing :/
me too
it worked great. thank you so much
awesome, thank you!
Buuuuut: It is still possible to have 2 seperated channels for Desktop Audio and Mcrophone?
Because now it works, but it’s unfortunately all on one track.
Wonderful article and extremely helpful. I’d also recommend Acethinker Online Screen Recorder which I have been using for many years. It supports recording system and microphone or both. I always take it to record videos and upload to YouTube so that I can share with friends. Share it here as an alternative to OBS.
Excellent blog post. This solved my exact problem perfectly.
Pingback: M 10.16 – Composing Digital Media
Thank you kindly. This was a troubling problem, a nightmare even as we have a broadcast coming up this weekend. Helped fix the audio issue.
Over a year later, this still saves butts. Thank you!
Hi- I am still having some trouble. I am trying to use the sounds from my Logic Pro music software for when I am streaming live on facebook. However, neither OBS or facebook is recognizing my external mic…facebook only recognizes built in mic. Any idea what I may be doing wrong?
Perhaps it isn’t supported on the Mac? When you go into System Preferences, Audio, does it show up as a possible input device?
Thanks! Did you manage to uninstall the Soundflower? It irritates me as well 🙂
I didn’t – I ended up just buying a new Mac 🙂
Obviously not just for that 😉
I followed all your directions and my issue is that I can only hear the input Audio in my stream. So it’s either you hear my Mic or you hear the game. I’ve fiddled around with every feature I can and have had no luck. I’m not super tech savvy so most likely I’m doing something wrong.
No, I’m not sure how to do that with this combination of software either. I don’t record my voice so not found it a problem, but I can see it might be for some!
As answered below:
It’s not free, but RogueAmoeba’s Sound Source will do what you want!
http://rogueamoeba.com/soundsource/
Any documentation for the RogueAmoeba’s Sound Source config in OBS is highly appreciated!
Helpful, though I find that the computer will only pick up a microphone if the microphone is set to an input source in Mac sound settings… though by doing so, I have to remove the multi-input device as the input source. So basically I have to choose between mic commentary and no desktop audio, or desktop audio and no mic commentary. Is there a workaround wfor this?
You should be able to have two audio inputs in OBS. In the mixer have “Mic/Aux” on (this is your mic), as well as Audio Input Capture.
I can record my desktop and mic audio but i cant hear anything coming from my desktop
See a reply above – although with my method you can record desktop and mic, to actually hear it’s one or the other, it seems.
Wait – got it!
It’s not free, but RogueAmoeba’s Sound Source will do what you want!
http://rogueamoeba.com/soundsource/
I did what you said but OBS still says I don’t have a device to capture desktop sounds
Make sure you add a new Audio Input Capture, not use “Desktop Audio”.
You mean that I need to go to sounds and change output to multi-output device, yes I have done that
Can I maybe show you what I see? because if I choose Multi Output Device it says “There are no output settings available for the selected device”
I am thrilled that I can now broadcast with my MAC and OBS, but the only way to send a loud enough sound is set the volume high, which annoys everyone around me within 40 yards, and I can use any Mic because of the feedback from the speakers because I can’t mute my own speakers because of the multiple output device. Do you have any advice for how I can set my volume loud enough for an appropriate setting to broadcast, but still not heart my own ear drums and enable me to use my mic without the feedback from the speakers blasting? Am I missing something?
I think the solution would be headphones rather than speakers!
Or, set the output device to speakers, change the volume down, then set the output device to Multi-Output again.
Ugh, so I can record my mic, the game sound and discord sound, but I can’t *actually* hear discord, despite following the instructions. Any ideas?
Finally someone who fixed the audio issue with Mac. I am forever grateful 🙂
//The Swede
Ishowu does not show up on my midi and sound control. I definitely installed and nothing shows up. Please help!
it didn’t work for me. i followed all ur instructions, but nothing. when i go to sound preferences, i showU, never appears.
it says builtin mic only. and doesn’t allow me to pick another one. like I’ve never installed ishowU.
and i definitely installed it. i have uninstalled and do it all over again like three times and nothing works
HELP!
This is super helpful! I’m so glad that I found your article. Thanks a ton!! 😀
You can also try ApowerRec in recording your screen. Get it here: https://get.cloudapp.help/hc/en-us/articles/223361507?page=1#comment_360000555313
THANKS A LOT BROTHER!
Ugh, just another “solution” that doesn’t work. Just move on.
It definitely works, as it’s the method I’m still using. If you could run through your problem maybe I can help?
I need help! I followed your steps exactly but nothing is happening! I can see the sound in the settings but nothing is showing up in OBS pleese help.
Thank you, this worked, OBS now captures the sound from the “desktop” as well. It’s mindblowing that on Mac OS you have to go through this kind of setup!
Hello, I tried this but I can’t add iShowU as an Audio input source, it is never shown there in OBS. I can, however, add it over the settings –> Audio. But this doens’t do the job. I did everything as you described it, only the source adding doesn’t work. I already restarted my mac, still I can’t add it as a source in OBS. Any suggestions? Should I maybe uninstall and reinstall or am I doing something wrong. I can still hear all my Desktop audio while recording, too, even though I didn’t do the steps for that because it’s not necessary for my purpose – I guess iShowU is not capturing the desktop audio, then? Thanks.
Thank you, it work amazing in my Mac Yosemite!
this helped a lot. i need to capture movie scenes for a video essay school project and had been struggling with a couple things and this helped to solve it. thanks!
I’ve done all of this and I understand that I’m a few years late to the party but my desktop audio won’t pick up with iShowU? I rechecked all the steps and I have two mixers, one for mic and one for desktop yet it still refuses to pick up anything on my desktop
You definitely have the output as Multi-Output Device?
Worked flawlessly. Thanks!
I just wanted to give a heads up that it would be very worthwhile to add a bit of additional information at step “step 6 is going into System Preferences > Sound and choosing IShowU Audio Capture” which is that there’s a caveat for macs running OS 10.13 or later (High Sierra/Mojave), because there are reports that using a Wacom or even a Magic Mouse with some settings enabled will actually prevent your clicks on the “allow” in your security settings from working. I was in fact using my trackpad and found that no matter how many times I clicked “allow” it would just flash and stay put, so I found this page on iShowU’s help site which straightened everything out: https://support.shinywhitebox.com/hc/en-us/articles/360003524192-iShowU-Audio-Capture-not-showing-up
turns out multiple reboots were needed in my case because there were a few KEXTs queued up from earlier, so please don’t discount needing to reboot, it’s not just BS, you really do need to reboot to install the KEXT.
OMG!!!! Thank you so much man!! You cannot believe how thankful I am just right now.
Thank you very much! To all the people who have problems with the “Allow” in system preferences button: Close the Chrome browser!
Thank you for this guide, it answered all my questions and solved my streaming audio problems.
Hi There
I am hoping that I am not too late for this BUT… I am using a Focusrite Sapphire 2i2 with a Audio Technica Mic (AT 2020) on the Second Input. I am also using 2x KRK Rokit 6s (Not sure if I used the corrected grammar there but, oh well ! 🙂 ) i have followed all of your, useful, steps and I have managed to get the audio coming out of my speakers.However… I am trying to get the audio to work with my DAW. I use Fl Studio 20. When I go to select the “IShowU” Audio Device in my DAW, I can see the audio signal is being played within my DAW, because I can see a visual representation in the “Master” channel, yet I am getting a delayed signal after the initial signal if that makes any sense to you?
I am trying to get this to work so I can finally start my livestream on Twitch 🙂
Thank you
Alex
I’m not familiar with any of that equipment so I’m not able to help I’m afraid!
Nice tip! Thanks a lot! You could also take a try of AudFree Audio Recorder for PC if possible. I think it works well.
Finally! Thank you so much! Saved me from running Windows 😉
found this in 2020 and this saved my life! thank you for this! you’re amazing <3
Recently something is very wrong with the software can somebody check to see what this feedback noise could be and if they get it and what solution:
listen to https://cafe.simplecast.com/episodes/fazale-rana at 18:45
It doesnt work
I did all of that stuff and it doesnt work I put the output on my mac to the multi output thing from midi setup and it still wont wont can you help? And also it wont let me change the volume.
For those who had this same problem I had: iShowU input audio is not showing up as a new Input Sound Device at System Preferences.
There is a trick: do System Preferences >> Security & Privacy >> select “General” Tab >> go to bottom options and press “Allow” button >> choose “MATT…”.
This set of actions will allow the IShowU drive to “talk” with your Macbook.
Thank you sooooo much! Works like a charm. Ps. somehow I had to configure the properties for Audio Input Capture twice! first time it didn’t showed any outputs. Needed this for usability testing – saved my @ss!
Thanks man! It really saved me some time as I was running across the same issues and it was driving me crazy. Such a basic functionality could have been catered for into OBS but guess for now we’ll have to make do with your smart workaround.
All the best,
Matt
Thank you very much for this! I have been trying to get a streaming setup for this game so I can play and stream it from a Mac while traveling and this finally worked! May all the gods bless you.
I found that if I use my Sound Blaster E5 headphone amp connected using USB then it works, I can record desktop audio using OBS on my mac.
In Apple menu, System Preferences, Sound, Output I choose “Sound Blaster E5 USB”
In Apple menu, System Preferences, Sound, Input I choose “Sound Blaster E5: What you hear USB”